Monday, June 30, 2008

Common toilet problems and remedies

Tampa Bay’s Handyman is here today to explain a little about the many issues that a toilet can give you. There’s a lot of things that can go wrong with a toilet since it is almost constantly being used and abused. Now let us talk about some of the most common problems we have with toilets nowadays.

Water constantly running
Toilet not flushing
No Water pressure
No flushing pressure
Bottom of toilet leaking


Now before we get into troubleshooting a toilet lets learn a little about what is inside the toilet tank that makes it work and flush. In my opinion there are only a few common parts in a toilet that cause a malfunction. The first one is the easiest to replace and fairly cheap, it’s the flapper valve, others have other names for the flapper but I am from Florida and if you find a maintenance man that doesn’t know what a “flapper” is in Florida then he is truly a fake. The flapper in a toilet tank is what lifts up when you push down on the toilet lever…which the flapper is connected by a metal or plastic chain to the flapper.
The second main part of a toilet tank is the ballcock or fill valve….the fill valve has a ball that regulates the water that enters the tank…there are different types of fill valves some that extend with a rod and some that don’t take up any space at all, although there are different types of fill valves they all work around the same principle.

The 3rd part that is in a toilet tank is the tower or “overflow” … This is rarely changed out in my experience as working as handyman/plumber in the apartment industry….So I am really not going to cover this unless there are requests too.
Toilet not flushing good
There is a restriction or a clog in the toilet drain, simple things that will clog a toilet every single time are paper towels, Q-Tips, Tampons, kids toys, basically anything that isn’t piss, poop, or toilet paper should not be flushed down a toilet. (Small goldfish are okay ).
1st try the trusty ol’ plunger like I explained in a previous post, or check the flapper by lifting it up and making sure that nothing is stopping or obstructing the flow of the water, if those don’t work then use a snake. If you are having clogs in multiple parts of the house you are going to have to pull the toilet up and use a heavy duty snake to unclog the main line.

Toilet Tank filling up slow

Make sure that the inlet valve is open up all the way. If is just barely open that will create a water restriction.
You could have a faulty or old fill valve. I personally would replace any fill valve that has a rod and ball just because they are an older model and always malfunction.

Replacing a flapper

Replacing a flapper in a toilet tank is the easiest thing to do in the world I do not care if you are mechanically inclined or not. 1st thing that you do is rip the piece of flapper that don’t belong there then hook the flapper up to the toilet tower, hold the chain up to the toilet tank lever, whatever link the bottom of the toilet lever is adjacent to hook the flapper chain into that link then hook the flapper hook into the end of the toilet lever. Done

Replacing a Fill Valve

First thing you want to do when replacing the fill valve is turn off the water supply valve going into the toilet tank. Once you do that flush the toilet to get most of the water out of the tank, there will be a little excess water left so you want to get that up with a wet vacuum or a towel. Unhook the hose that is going into the overflow tower. Then loosen the supply line going to the bottom of the old fill valve, then loosen the nut that’s holding the fill valve into place. Remove the fill valve. Put new fill valve into toilet tank. Secure the fill valve with the new nut tightening to under the toilet tank. Reconnect the supply line, hook up the hose from the fill valve to the overflow tower. Turn the water on. Done.

Note:Fill valves come with illustrated instructions on how to install the product inside the box.

Bottom of Toilet Leaking

When there is water coming from the bottom of a toilet when flushed this usually means that the seal is bad and the wax ring has to be replaced. To replaced a wax ring you simply turn the water off, disconnect the supply line, loose the floor bolts that are holding the toilet down. Pull the toilet up and set somewhere. Put the new wax ring across the hole, every time I do this I replace the toilet floor bolts to but it’s your choice. Place the toilet back on the wax ring making sure the two floor bolts go through the holes, now once you commit you can’t lift the toilet back up, it will mess up the seal and you will have to use a new wax ring. Tighten the toilet bolts down, be extremely careful to not over tighten the nuts or the toilet will crack. Reconnect the supply hose and turn the water on. Flush a couple of times and the check for leaks. That’s all for today about toilets, til next time.

Toilets, flapper, fill valve, plumbing

Bookmark and Share

Sunday, June 29, 2008

Cleaning out an A/C Condensate line

Tampa Bay handyman here again to talk a little about cleaning our your air conditioner condensate line. You will more then likely have to do this once a year. See there is always going to be a little water in your drip pan running through the air conditioner condensate line as long as your running the air conditioner. When your not running the air conditioner thats when the slime sludge will start to build up, and eventually the condensate line will clog and it will either trigger the air conditioners float switch killing the power to the air handler or it will flood your house.

So before you go out and pay some hvac technician a couple hundred dollars to do about 5 minutes of work just keep reading. What you will need is just a wet/dry vacuum. Go out side and locate where the condensate pipe is. Turn the vacuum on and suck away, let the vacuum suck out the line for a couple of minutes to make sure it gets all the sludge out of the condensate line. Thats it, your drain line should be clear for a couple months to a year.

This is by far not the only way to clean out a air conditioner condensate line the method above is the method that I use because I have found that it works the most efficient and I usually don't have callbacks when I use the wet vacuum. They sell tools like the gallo gun which uses nitrogen cartridges to blow the line clean from the inside, some hvac technicians will use nitrogen tanks, or "the drain dog", you could also hook a garden hose up to the condensate line and turn the hot water on and flush the drain out. And I've even heard that grapefruit juice will dissolve the slime sludge.

Whatever method works for you. If you wanna prevent sludge from building up at all they sell condensate tablets that are designed to stop sludge growth, you just pop them in your drip pan about once a month. Okay, short lesson, thats all from the Tampa Bay Handyman today on air conditioner condensate lines.


Bookmark and Share

Saturday, June 28, 2008

Handyman How To - Replace a A/C Condenser

It’s Tampa Bay’s handyman here again. In this lesson I will be explaining how to replace an A/C condensing unit for your house, apartment or condo, which is outside. The air handler is inside and I will explain how to do this in the next lesson. First thing you should be aware of before you attempt to do this I am assuming that you have your HVAC certification and have made repairs on air conditioners before. You should also be skilled in sweating copper pipes together, if you can sweat copper pipes and have a little common sense with hooking up electrical and handling Freon then replacing an air conditioner condenser is very simple.

Removing the old condenser

First step we have to take is to recover the refrigerant from the old air conditioner condenser. To do this you will need a recovering tank and possibly a recovery machine to speed up the process. DO NOT just vent the old refrigerant into the atmosphere, if you do and are caught you will lose your HVAC certification and will be fined thousands of dollars. While the old refrigerant is recovering into the tank the next step is to undue all the electric on the air conditioner condenser.
Before you start untying wires on the air conditioner MAKE SURE THAT THE POWER IS OFF ! You can check this by using a volt meter. There should be two 24 volt wires, two 120 volt wires connect to the bottom of the contactor, and a ground wire. Now once all of that is disconnected and all of the refrigerant is recovered you can start cutting the copper on the air conditioner condenser. To do this you will need a pipe cutting tool. Once cut it is recommended to sand the copper ends as best as you can to make it easier to sweat the copper onto the new air conditioner condenser. Now remove the old unit. I wouldn’t just trash it either I would scrap it at a junk yard, quick 20 bucks or so for the copper inside the coils.
If you purchased a brand new air conditioner condenser then it should be pre-filled with Freon. Most of the house air conditioners today use R-22, in 2010 this will change though.

Installing the Air Conditioner Condensing Unit

Okay this is what I personally do when I install an air conditioner condenser. The first thing I do is remove the caps from the high and low side inlets and remove the valve cores, I do this because you are going to be holding a torch very close to the valve cores and sometimes they will get so hot they will bend and will not be any good any more. You may need some extra copper piping to make a good connect it to the high and low side inlet. You want to make sure you have a good connection at the low and high side inlets you can do this by having copper fittings that will join the copper piping together.

Next step is to sweat the copper lines together with a torch and solder. To get a good idea on how to do this just google “sweat copper” and a bunch of tutorials will explain and show you how to do it. Now you got a good connection on the copper pipes, check it closely with an inspection mirror, if you don’t see any holes then you should be good to go but we will find out if there is a leak or not when we are vacuuming out the lines. Have a wet rag handy to cool off the copper lines. Next thing I would do is insert the valve cores back into the high and low side inlet of the air conditioner condenser.

Hook up you’re A/C gages to the low side of the air conditioner condenser, open the valve on your gages to the low side, the middle hose on the gages should go to a vacuum pump, turn the pump on and open the valve on the pump, your low side gage should eventually read about 30” suction or ‘mercury’, once it does hit 30” close the low side on the gages, if the gage stays at 30” than you don’t have a leak, if it drops then you have a leak and need to find it with some type of leak detector, you will probably have to re-solder the leaky connection.

Ok so if you have no leaks open the low side on the gages back up, let the low vacuum pump out all the air and gases and non-condensable’s out of the copper lines for about one hour. While this is going on you can start hooking up your electric. Hook it up the same way you unhooked it from the old condensing unit. Two120 volt wires to the contactor, and two 24volt wires together. Put the panel back on. Once you have all the electric hooked up and vacuumed out the copper lines you can shut the pump off. Then grab the correct sized Allen Wrench and open the King Valves on both the low and high side of the Condenser letting all the Freon flow through the copper lines to the Air Handler. Turn on the air conditioner from the thermostat. Hook up your gages and test for correct pressure. That’s it, now your summer days will be cool with your brand new air conditioner.


Bookmark and Share

Thursday, June 19, 2008

How To Be A Handyman - Replace a Water Heater

How to replace a water heater, this tutorial the Handyman will be going over how to replace an electric water heater, typically the average household sizes.(About a 30 gallon water heater or so) Now let me explain something real quick before you go out spending tons of money on a new water heater, because the only time you should fully replace a water heater is if its leaking from the bottom or middle of it.

If the water heater isn't leaking and is just not working it could be due to a couple of things....like a bad water heater element, a bad water heater thermostat, or simply just not having power going to the water heater. So the first that I would check would be the breaker to the water heater. ... or if you have a volt meter you can check it for proper voltage.(Usually 240v)

Note:If you have no handyman or plumbing experience I do not recommend you trying to repair or replace your water heater just seek a plumber or maintenance guy that knows what hes doing.

Okay on your typical 30 gallon+- electric water heater theres commonly two heater elements. Some people like to test the elements and thermostat with the power on but it is very unsafe and unnecessary.

Troubleshooting the water heater thermostat the safe way:

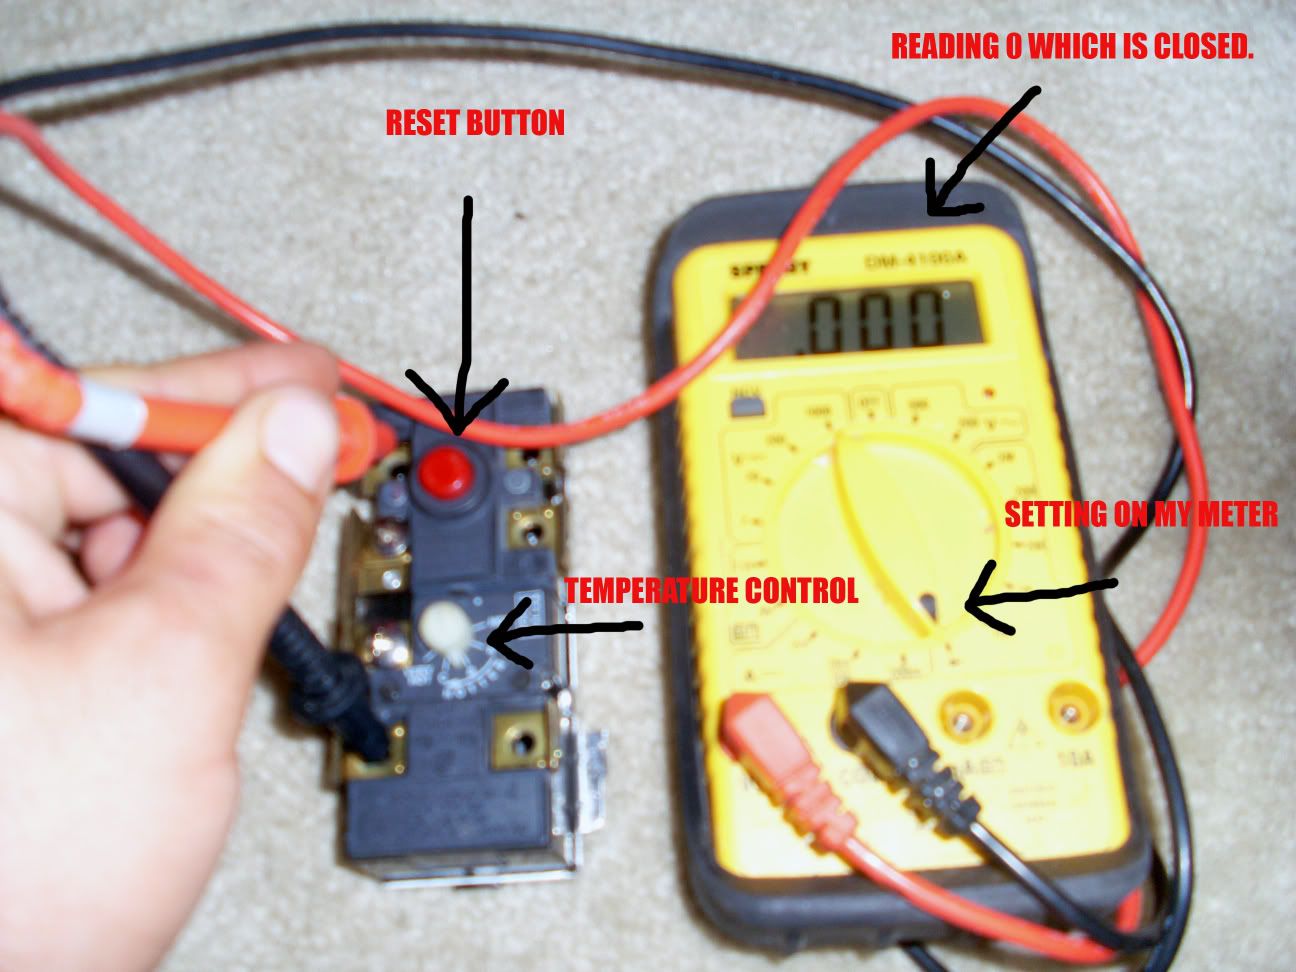
Turn the power off to the water heater, then remove the access panel to the water heater. Look at the thermostat to see if the reset button is out or in, if the reset button is popped out just push it back in. That should solve the problem but if it is in then let us move on to testing the water heater thermostat. Assuming you have the power turned off (you better) remove one wire from the thermostat it doesn’t matter which one. With a multi-meter in hand set it to resistance or rx1,touch the probe to the top screw and the other probe move along the other screws to test each individual one, the multi-meter will either read 1. (which is open) or 0 (which is closed). You might get some numbers like .005 jumping around but it will eventually hit 0. If it is closed you will have to replace the thermostat. Below is a picture of me testing a bad thermostat.

click the image to see it fully
Photobucket

Do the exact same thing to the other thermostat
You do the exact same thing to test the water heater elements.


If you have a fairly new water heater then I would first check to see if you still have a warranty on it so you can get a professional Handyman to come out and fix it for free....If thats not the case then just keep reading and the Handyman will tell you how to replace the heater elements and/or heater thermostat.

To replace a water heater element first thing you have to do is secure the power and then you wanna turn the supply water off by closing the inlet valve. If you don't do this you are going to flood you entire house. Then you will need the right sized wrench to fit over the heater element. Have a towel in handy because water is going to come out. Unhook or unscrew the wires that are going to the heating element. You are going to need the right size lug wrench to loosen the water heater element. Then loosen the heating element until you can pull it out. Then quickly tighten in the new heating element. Re-hook or screw the wires back the way that they were on the old heating element. Some people would recommend draining the water heater first but I have replaced many elements and as long as you have a towel in hand and do this swap out quickly it is not necessary to drain the water heater. By all means if you feel uncomfortable about doing this with water coming out then drain the water heater.

To replace a water heater thermostat first thing you have to do is secure the damn power so you don't wind up shocking the crap out of yourself. Then you unscrew the screw securing the thermostat the unhook the wires going to it but just make sure that you remember where the wires hook up too....Install the new water heater thermostat by taking back steps from removing the old water heater thermostat.

Okay now lets get down to the subject of the titled post, How To Replace a Electric Water Heater

Removing the Old Water Heater

You will have to look at the connection hoses on the water heater to see if you will need compression fittings or just plain ol' no burst water hear supply line, or you could just use the old water heater lines if your budget is a little low but I wouldn't recommend it. What I would definitely recommend is to have some nipples for the cold and hot side.

How to remove the old water heater, shut off the inlet valve. Go to the bathroom or somewhere there is a hot water faucet and open the hot water valve to be sure that the hot water is turned off. Next you will need a garden hose to attach to the drain valve at the bottom of the water heater. Attach the hose, make sure the end of the garden hose is somewhere that it can discharge about 30 or so gallons of water..like outside or a toilet....open the drain valve.....now disconnect the cold and hot water heater hoses from the top, also disconnect the t&p valve connection. Let the water drain....a water pump makes this process much more quickly....while you are waiting for the water to drain you can start undoing the electric.....once all or most of the water is out of the water heater it will be light enough to either wheel out with a dolly or carry out with the some help...

Installing the New Water Heater

Warning: You should have a tub faucet or sink hot water valve fully open before you open the inlet valve to fill the water heater....and do not turn the power on to the water heater until it is full of water or you will fry the water heater elements.

First thing you need to do is connect all of the hoses, the cold water inlet, the hot water outlet, and the relief valve hose which is optional. then you need to open up the inlet valve and fill the water heater up with water. While your filling the water heater up with water you can hook up the electric....there should be 2-3 wires...the two main wires are going to be two hot wires, then there should be a ground wire for safety...hook all these up, ground goes to anything metal, secure the ground however you can......now you have the electric hooked up.

With a couple of hot water valves open you just have to wait for the hot water to start pouring out..(its not going to be hot until the breaker is on)...Once the water starts coming out of the hot knob or valve you want to check for leaks...if there are no leaks...then you can turn the breaker on for the Hot Water Heater. In about 30 minutes you will have some hot water from your brand new Hot Water Heater


Bookmark and Share

Tuesday, June 10, 2008

Handyman tells how to install/replace a dishwasher

This post has been updated with illustrations. How to install a dishwasher


Hello again from your favorite handyman. In this lesson I will teach you how to remove and install a dishwasher without shocking the shit out of yourself and flooding your house/condo/apartment etc. 1st thing you need to do is make sure the power is off. Go to the breaker box and turn the breaker to the dishwasher off. If the breaker is not labeled you can have a friend hold a meter up to one of the wires and flip the breakers until the meter stops beeping. Or you could just run the dishwasher and flip the breakers until you can hear the dishwasher shut off. Either way a meter is highly recommended by this handyman when it comes to electricity.
Next step you want to do if you haven't all ready is make sure that the hot water supply going into the dishwasher is shut off. Okay now we can start removing everything. grab a pair of channel locks or a wrench and undo the hose going into the hot water supply valve. then there should be a drain hose it usually hooks into the garbage disposal. unhook it by loosing the clamp with a screwdriver or wrench whatever it takes, now you should have the supply line and drain line disconnected. next is the electric, there should be a panel held in by a couple of screws. unscrew the screws and locate where the wires are connected by wire nuts. unscrew the wire nuts, now just pull the dishwasher carefully out, u may have to lower the feet so it will slide out. there might be a couple of screws securing the dishwasher to the counter top at the top of the dishwasher. Just unscrew them if their are then the dishwasher should slide right out. u might want to jam a rag into the end of the drain line to avoid water leakage. now the old dish washer should be removed. Next from the handyman.

Handyman Tells How To Install a Dish Washer

Connect the supply line and drain line to the bottom of the dishwasher, teflon tape and a 90 degree brass elbow may be needed for the supply line. Run the drain line and supply line to the water supply valve and drain inlet(either garbage disposal or sink drain) If your installing a dishwasher surrounded by new cabinets you may need to drill or cut a hole through the wood so the hoses can fit through. Hook up your electric wires with some wire nuts, (black to black,white to white...ground to metal, usually green) with the supply line and drain line ran they should be hooked up just like they were disconnected. Adjust the feet at the bottom of the dishwasher to the counter top, secure it with some short screws, turn the power back on, turn the water back on , run the dishwasher and check for leak under the sink and under the dishwasher itself with the cover panel off, once confirmed there are no leaks put the front panel back on. Thats it, u just saved yourself about 200 bucks from hired some handyman to do this simple job. Signing off the Handyman.

How To Unclog a Toilet

So you are here because you want to know how to unclog a toilet. First thing is how bad is the toilet clogged ? If its flushing but just flushing slowing then the handyman recommends a plunger. Its very easy. Thought his Handyman recommends a heavy duty plunger not one of those 2 dollar plungers that just move upward when you try to plunge the exit of the toilet bowl. Grab your heavy duty plunger and make sure it is covering the hole inside the toilet bowl. Press down on the flush lever just enough to where water is rising and almost bout to overflow out of the bowl, this is to ensure that we get good pressure to unclog whatever is clogging the toilet pipe. Give three short pushes then push the plunger all the way down. Keep repeating this process until toilet is flushing normally.

If this simple technique is not working you may need to use a 6 foot snake. A snake is a metal spiraling turd terminator. You basically just stick it in the hole then crack it down as far as it will go then bring it back up. It is much better then the plunging method. The snake will either push whatever is blocking the water flow out of the way or it will pull the obstruction back up out of the toilet bowl. If both of these methods fail the Handyman then suggest that you pull the toilet up. You will have to have a toilet wax ring to do this and a pair of pliers to un-tighten the toilet bolts. The handyman recommends a new set of toilet bolts but it is not always necessary. Once you got the two toilet bolt nuts off you might need a razor to cut through any caulking that may be around the base. There will be a water supply line connected to the tack. Shut off the supply inlet valve to the toilet. Loosen the supply line to the tank. Now the toilet is ready to be pulled up.

If you have a shop vacuum the handyman recommends vacuuming out the water 1st making it easier to lift up. Just be sure to empty the vacuum outside and plug your nose because it is going to smell like shit ! Look down in the drain where the toilet was. If you see water still there the you are going to need a long rooter to snake the main drain line. This shouldn't be the case though this doesn't happen that often unless the piping is very old. If theres no water there then the problem is in the toilet. Flip the toilet over carefully because it is fragile against hard surfaces and will break. Look into the bottom hole to see if anything is blocking it, usually its a kids toy or some Q-tips.... remove the obstruction and flip toilet back over. Place wax ring on ground where the hole is at. Set toilet floor bolts straight up aligned across from each other. Set toilet on hole. Once set try not to move toilet or lift it back up or wax ring will lose purpose. tighten nuts on toilet bolts. Reconnect supply hose. Turn water on. Flush. This is how to unclog a toilet. If this does not work let me know and I will tell you what to do. Signing off, your favorite handyman.

plumbing, toilet, clog

what it takes to be a handyman

To be a Handyman you must have some commonsense. Sound stupid? No it isn't because there are a lot of smart guys and gals out there that are smart and will try and replace a outlet receptacle accidentally touch the hot wire and shock the shit out of their self ! Or go to change a faucet out undo the hose line only to be given a quick shower ! (I know this because I have done this before, yes I am a dolt when I am hungover) Handyman tasks can cover a variety of things, especially around an apartment complex or a home. Different handyman light tasks can include replacing a faucet, replacing a sink, replacing a stop valve, hanging up a fluorescent light fixture, hanging a ceiling fan, changing a bad outlet, repairing counter top drawers, installing a range hood, even plunging a toilet. Some more advanced handyman tasks could include replacing a air conditioning condenser, replacing a air handler, replacing a water heater and many others. A handyman in a nut shell is a Jack of ALL trades. If anything is broke around or inside the house a Handyman should have a general idea of what needs to be done...besides pulling out the wallet and paying somebody else a shit load of money to do a job that would take a handyman 5 minutes. I myself work as a handyman for a apartment complex, we have 5oo units so that means 500 air conditioners and heaters. I get about 3-7 air conditioner calls a day. There is a huge list of things that could be wrong with air conditioner (which I will get into further detail later) and I as a handyman need to know how to troubleshoot all of the symptoms, know WHY the air conditioner coils and pipes are frozen and know what actions I have to perform to stop this from happening. A big part of becoming a handyman is knowing your basics about electrical work. How to use a meter and trouble shoot electrical issues back to the source of the problem and fixing it. And remembering to never try and repair an electrical issue unless the power is secured to it!! These are just a few of the things that I think it takes to be a handyman. I haven't even got into flushing a toilet and having it overflow with nasty crap all over the ground, and what you have to do to it when the trusty plunger or snake isn't unclogging it. So what things do you need to know to be considered a handyman?? Basically everything. Hail to the knowledgeable handyman.

Wednesday, June 4, 2008

handyman tells how to replace a bad outlet

UPDATE: I have made an illustrated walkthrough step by step to Replace a bad outlet


handyman pro tells u how easy it is to replace an outlet receptacle. All you will need is a couple of tools and some handyman knowledge and common sense.

handyman tools required: needle nose pliers and a screwdriver (probably a phillips head screwdriver)

1st thing to do is secure the power, if one of the receptacles is working plug a radio into it an flip the breaker until it turns off. If its not working out at you can also use a voltage meter to see if the power is off. Theres some other ways also like intentionally blowing the breaker off but IM not going to say because if you dont know then you shouldnt try it because you will probably shock yourself to death.

Okay. Power off. good. Unscrew screws mounting it. Loosen the screws that hold the 2 wires(sometimes 3 or 4 or 5 depending if its controlled by a toggle switch and has a ground properly set up)

note: some outlets have a smaller gage wire that just pushes into the holes on the back of the outlet you can easily wiggle them out and insert them if they fit

If the wire is to big to fit into the holes you have to attach them to the screws on the side.

handyman tip:

The hot wire(s) generally go to the right hand side of the outlet(if the receptacle is facing you)

The neutral wire(s) generally go to the left.


bend the un-live wire and secure it to the screw.(Or slide into the holes on the back of the outlet if applicable.)

Secure the mounting screws. Make sure no bare wire is touching anything but the outlet receptacle.

turn the breaker on. If you dont here a pop your good. test it. done. They also sell outlet receptacle test plugs that cost 5-10 bucks they will tell you exactly what is wrong with the receptacle.

thats it. questions are welcome and will be answered
Signing off the handyman.

Tuesday, June 3, 2008

How to be a "Handyman" intro

A Handy Man is someone who is knowledgeable in mostly
all home improvement and repairs. From servicing ovens,
repairing and replacing dishwashers, servicing refrigerators,
Hvac repair replacement etc. So why waste money to pay
some Handy Man a crap load of money to do a small task
you could have done in about 10 minutes or so. Any
handyman is just out to overcharge you anyway its how
they make thier money. Im a Handyman at an apartment
complex so I dont get this privelage of doing this
since I onky get paid by the hour. But I have been a
handyman for about 7 years and I am here to spread
my Handyman knowledge to everyone who reads this blog.
I will explain every article the best I can and will
answer every question that you might have or any problems
you could run in to. And eventually I will have an
article on repairing and installing everything. Some
of the work I will be writing How To's on are Hvacs,
dishwashers, garbage disposals, water heaters, installing
sinks, installing faucets, how to unclog a toilet, how
to replace a wax ring, replace a flapper and fill valve,
more "handyman" crap. Installing locks, hanging up
light fixtures, ceiling fans, change a light bulb, (lol)
and will be taking any handyman request on anything
you might need help doing. I am the master Handyman,
my knowledge is strong, so ask this handyman whatever..

Sunday, June 1, 2008

hello from the handyman

Welcome to How To Be a Handyman. This site offers troubleshooting tips and techniques in all the Handyman categories. If you have any questions you can post a reply here or email me at dwep2@hotmail.com.